No products in the cart.
Just think, you’re stepping into your garden on a sunny Saturday morning. Birds are singing and the air smells fresh. Then, you notice a neat path inviting you in. On one side, a small raised bed grows herbs. Meanwhile, on the other, a cosy bench waits. All of this was created without expensive tools or complicated plans. In fact, it didn’t take months to finish. This is exactly why garden design with sleepers and gravel works like magic. With just a few tools, timber sleepers, and gravel, you can transform any garden.
In this guide, we’ll show you step by step how to plan, choose sleepers and gravel, and add the final touches. You’ll learn how to create neat paths, raised beds, and a cosy corner without stress or spending too much.
Why Choose Sleepers and Gravel for Your Garden
Step into your garden, and it immediately feels organised, fresh, and inviting—thanks to sleepers and gravel.
- Timeless Look: Warm wood and crunchy gravel make plants, furniture, and lights stand out beautifully.
- Clear Structure: Sleepers shape beds, paths, and steps, keeping everything neat and in place.
- Easy to Care For: Gravel stops weeds, and sleepers are strong and long-lasting.
- Eco-Friendly: Reclaimed sleepers and natural gravel are kind to the planet.
- Fits Any Garden: Big or small, simple or fancy, this combo works everywhere.
With sleepers and gravel, your garden will become a tidy, natural, and relaxing space that you can enjoy every day.
Tools & Materials You’ll Need
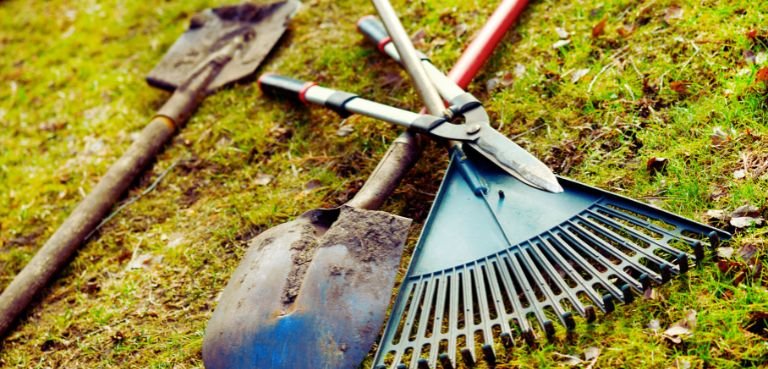
You don’t need fancy gear—just the basics:
- Tape measure
- Spade
- Hand tamper (or a plate compactor if you have one)
- Drill/driver + exterior screws
- String and pegs
- Gloves and eye protection
- Sleepers (around 200×100 mm)
- MOT Type 1 sub-base
- Weed membrane + pins
- Gravel (10–20 mm)
- Edging (sleeper, metal, or flexible plastic)
That’s it! You can start your garden design with sleepers and gravel with these simple tools and materials.
Steps for Garden Design with Sleepers and Gravel
Step 1: Sketch & Mark Out
First things first—grab a piece of paper and doodle your garden plan. Don’t worry if it looks like a toddler drew it. Then, head outside with some string or spray paint and mark it out. Also, make paths at least 80–100 cm wide so you don’t bump elbows with your garden gnome.
Step 2: Pick Your Sleepers
Now, let’s talk timber. Go for new pressure-treated softwood—it’s cheap, safe, and won’t complain when you drill it. If you feel fancy, use hardwood. However, no old railway sleepers with tar—your veggies and kids will give you the stink-eye. 200×100 mm is perfect for strong frames.
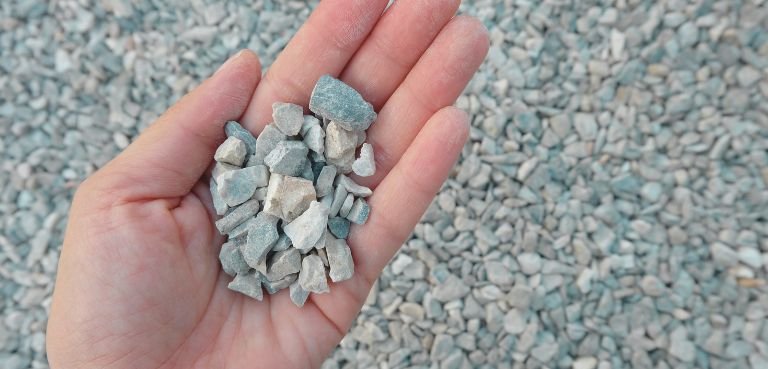
Step 3: Choose the Gravel
Next, pick your gravel. 10–20 mm works best. Angular gravel likes to stay put; rounded gravel is more like, “Hey, I’m just rolling around here!” Also, pick a colour that looks good with your house. And don’t forget edging—otherwise your gravel will escape like tiny rebellious pets.
Step 4: Prep the Ground
Now, dig up the turf. Rake it roughly level. Don’t overdo it; your back will hate you later. Remember, make a tiny slope away from the house. Water doesn’t like to stay put, and neither do you if your patio floods.
Step 5: Add Sub-Base & Membrane
Here’s the secret to a garden that stays level and weed-free: spread 50–75 mm of MOT Type 1 and press it down well. Then lay the weed membrane on top, overlapping the edges a little, and pin it in place. Think of it like giving your garden a little superhero cape—it keeps everything neat and in order.
Step 6: Build the Sleeper Frames
It’s time to play with your sleepers! Lay the first row level and screw the corners together. Next, add stakes if the row is super long. If stacking, stagger joints like a brick wall. Bonus: It will make you look like a pro, even if you’re just winging it.
Step 7: Edge the Gravel Area
Choose your edging style—sleepers on edge for a bold look, slim metal for a sleek feel, or flexible plastic for gentle curves. Make sure the top is level too, so sweeping and mowing stays easy and stress-free.
Step 8: Pour & Rake the Gravel
Pour 40–50 mm of gravel. Rake it smooth. Pretend you’re frosting a giant cake. Then, wait a week and top up thin spots. Gravel has its own ideas about where to settle.
Step 9: Plant & Add Seating
Cut small X-slits in the membrane. Plant hardy herbs or flowers—lavender, thyme, maybe something that won’t complain about your black thumb. Then, throw in a bench and a few pots. Finally, your garden is basically Instagram-ready.
Step 10: Quick Care Every Month
Finally, spend ten minutes raking, topping up and trimming edges. Also, wipe or oil sleepers once a year. Think of it as a spa day for your timber.
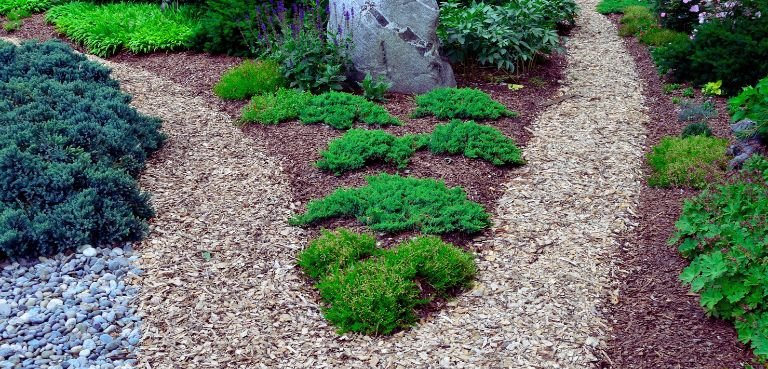
Design Ideas That Always Work
Even small gardens can look amazing if you plan smart. Here are a few ideas that never fail:
- Narrow garden: For long, skinny spaces, try a diagonal path leading to a cosy corner seat. It makes the space feel longer and more inviting.
- Shady spot: Next, brighten up shady areas with pale gravel. Then add ferns or hostas in the sleeper beds for lush greenery.
- Sunny nook: Finally, create a small square patio with warm-coloured gravel and a simple herb bed in sleepers. Just right for early coffee and easy afternoons.
Common Mistakes to Avoid
Even if you carefully follow the steps, a few hiccups can sneak in. So let me share what trips people up the most:
- Over-digging: Don’t go digging like you’re on a treasure hunt. Your back will definitely remind you later; honestly, it’s usually unnecessary.
- Skipping the sub-base: Also, never skip the sub-base! Think of it as the foundation of a house. Without it, your path or patio might sink or wobble, and nobody wants that.
- Wrong membrane placement: Lay the weed membrane on top of the sub-base, not underneath. It’s like wearing your shoes the right way—you want them to work properly!
- Edges too low: Make sure your edges sit slightly above the gravel. Too low and everything looks messy—and sweeping becomes a workout.
- Marble-white gravel in leafy areas: Finally, don’t pick marble-white gravel if you have trees. Leaves, twigs, and debris will appear like glitter after a party.
Follow these suggestions, and your garden will remain neat, tidy and easier to enjoy. Trust me—you’ll thank yourself later!
Budget Smarts
Let me tell you a secret: you don’t have to spend a fortune to make your garden look amazing. First, splash out on the stuff that really counts—your sub-base, edging, and a good weed membrane. Think of these as the superhero team of your garden—they keep everything standing strong and looking neat for years.
After that, don’t feel guilty about saving a bit on gravel. Mid-priced angular chippings look great, stay in place, and won’t hurt your wallet. Also, buy 10–15% extra gravel—because topping up later is much easier than running back to the shop.
A few quick tips:
- Compare prices—local suppliers sometimes have hidden gems.
- Check if sleepers or edging can be discounted or reclaimed.
- Stick to simple gravel colours—they look great and cost less.
- Order just enough—too much is a waste, too little is a headache.
Follow these, and your garden will look amazing without breaking the bank!
Pet- & Kid-Friendly Tweaks
If you have little ones or furry friends, a few simple tweaks can make your garden safer and more fun for everyone.
- Gravel for paws: First, choose rounder stones so pets don’t hurt their feet. Sharp or jagged gravel can be uncomfortable or even cause cuts.
- Sleepers: Next, sand down sharp corners. Kids love to run around, and you don’t want splinters turning playtime into a trip to the first-aid kit.
- Scooter and bike paths: Use pavers or sleepers to leave a hard strip. This gives scooters and bikes a smooth, safe path without damaging gravel areas.
- Football zones: Finally, avoid loose white stones near areas where kids play football. They can fly everywhere, make a mess, and even cause small injuries.
Do these little tweaks, and your garden will be safe, playful, and chaos-free—so your kids and pets can run wild while you sip your coffee in peace!
FAQs
- Should you put gravel under sleepers?
No need—just a compacted sub-base works best. Gravel goes on top for paths or patios.
- How to make a gravel garden look pretty?
Use neat edging, subtly mix gravel sizes or colours, and add plants or pots for texture.
- How to make garden sleepers look better?
Sand rough edges, stain or oil them, and keep them clean to show off their natural beauty.
- Can you lay sleepers directly on soil?
You can, but they may rot faster. A compacted sub-base keeps them level and long-lasting.
- How long will sleepers last in the ground?
Pressure-treated softwood lasts 5–10 years, and hardwood can last 15+ years with care.
Conclusion
Just imagine standing in your garden, hands dusty, coffee in hand and thinking, “Did I really make this?” With a few timber sleepers, a sprinkle of gravel, and some elbow grease, garden design with sleepers and gravel can turn even the dullest patch into a little paradise. Soon, paths, raised beds, and cosy corners appear like magic—and you get to enjoy and show off your beautiful garden.
Even better, it’s not just pretty—it’s low-maintenance, so you spend more time enjoying your garden than sweating over it. Add a few little tweaks for kids or pets, a bench for your tea, and suddenly your garden isn’t just a space—it’s a stage for tiny adventures, quiet mornings, and Instagram-worthy moments.
So, why wait? Grab your tools, get your hands a little dusty, and dive into the Landscape Gardening Course at Wise Campus. Learn all the tricks to turn any outdoor space into your paradise—fast, fun, and totally satisfying!

Landscape Gardening Course
Course Description :
- Certificate: Yes(Free)
- Accreditation: CPD Accredited
- Access: Lifetime