No products in the cart.
The steps for preparing a natural henna paste start with four simple things: fresh BAQ henna powder, water, sugar, and skin-safe essential oil. Mix them well, let the paste rest for dye release, then test the stain before filling your cones. The key is not adding more ingredients. It is using fresh powder, waiting at the right time, and adjusting the texture slowly. This guide follows a simple method: mix small, release right, and stain smart. So, you can make smoother paste, avoid weak stains, and create safer henna designs with more confidence.
Now, let’s dive in and explore each step, from mixing your first small batch to getting a smooth paste and deeper stain.
What are the Steps for Preparing a Natural Henna Paste?
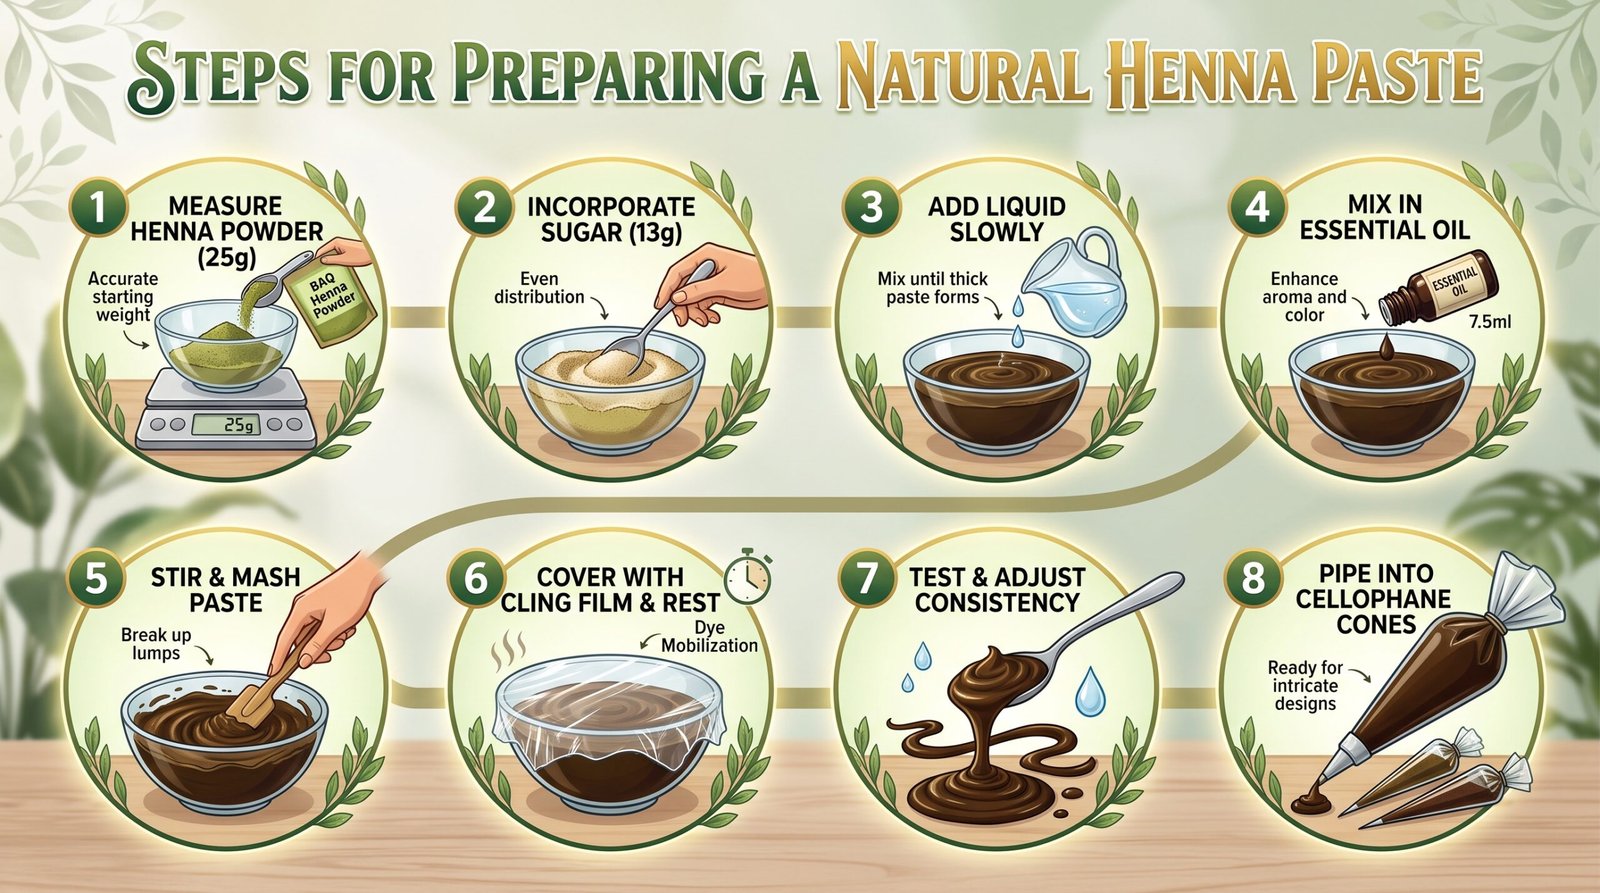
The steps for preparing a natural henna paste begin with sourcing fresh, finely sifted BAQ henna powder. You then combine this with sugar and a liquid—usually water—to create a thick base before adding essential oils to activate the Lawsone dye. After a resting period known as “dye release,” you test the colour, adjust the flow, and transfer the mixture into applicator cones for use or storage.
The Quick Process:
- Source fresh BAQ henna powder.
- Weigh your ingredients using a digital scale.
- Combine the henna powder and sugar.
- Slowly incorporate your liquid to prevent lumps.
- Add essential oil to deepen the stain.
- Seal the bowl and let the paste rest.
- Conduct a spot test to check for dye release.
- Adjust the texture until it flows smoothly.
- Fill your applicator cones.
- Use the paste immediately or store it in the freezer.
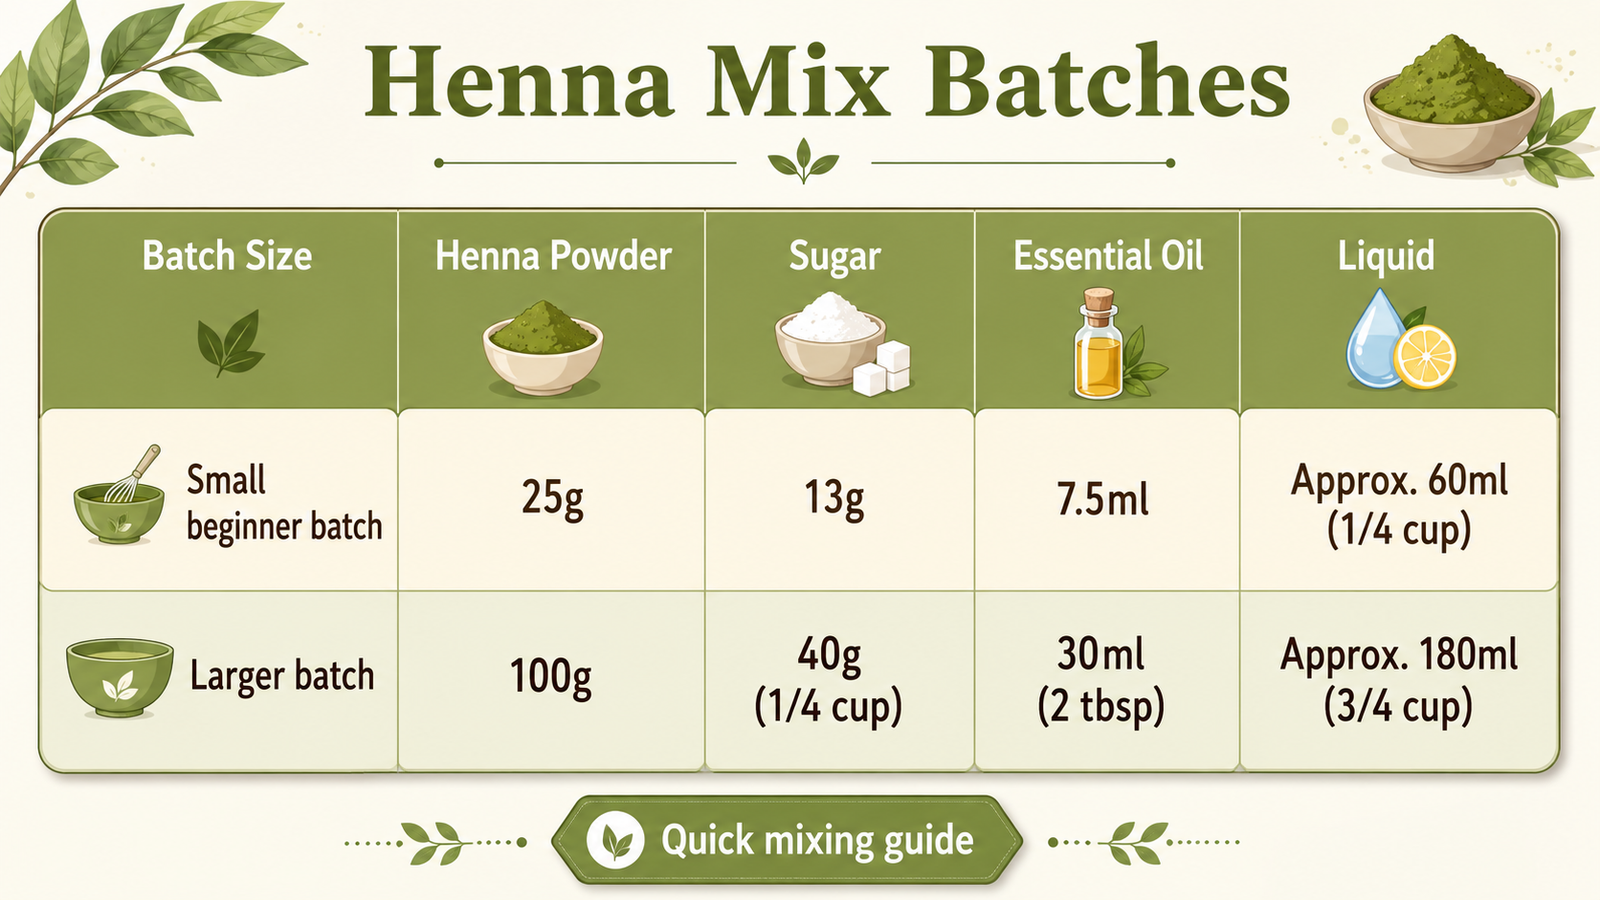
Recommended Recipe Amounts
Why Should Beginners Mix Small First?
When you are first learning the steps for preparing a natural henna paste, the temptation is to make a massive bowl of product. However, working with a 25g batch is the smartest move a novice can make. Smaller amounts are far easier to stir, meaning you can achieve a silky, lump-free consistency with much less physical effort.
The most major benefit is that you can test the process freely without worrying about wasting costly ingredients. If you accidentally add too much water or choose an oil that doesn’t react well, you only lose a small handful of powder rather than a full 100g bag. Small batches also allow you to discover your “signature” texture—whether you prefer a creamy Jamila style or a stringy Rajasthani flow—much faster.
What Makes Natural Henna Paste Work?
Natural henna paste works because the leaves of the Lawsonia inermis plant contain a dye molecule called lawsone. When the leaves are ground into powder and mixed with a water-based liquid, these molecules are released from the plant fibres. Once applied to the skin, they migrate into the top layers of the keratin and bind permanently.
The reality is that environmental factors like warmth and humidity are just as important as the ingredients themselves. Warmth acts as a catalyst for the chemical transition, while cold temperatures can stall the process entirely. Freshly made paste always provides a superior stain because the dye is at its peak strength right after the release window closes.
Which Henna Powder Should You Use for Skin?
You should only ever use fresh Body Art Quality (BAQ) henna powder for skin designs. BAQ henna is distinct from the variety sold for hair because it is sifted multiple times through fine mesh to remove every trace of plant fibre. This ensures the paste flows through a tiny cone opening without causing frustrating clogs.
The biggest issue is that many grocery store powders labelled “natural henna” are actually intended for hair and contain grit or metallic salts. To ensure success when preparing a natural henna paste at home, always buy from a specialist supplier who can provide the harvest date.
- Freshness: Look for a vibrant, bright green colour; brown powder is often old and weak.
- Sift: Choose “triple-sifted” powders for the smoothest experience.
- Variety: Rajasthani henna is famous for its “stringy” drape, which is perfect for long, flowing lines.
- Alternative: Jamila or Pakistani henna is often creamier, making it ideal for dots and thick fills.
What Ingredients Do You Need for Natural Henna Paste?
A professional henna mix only requires four basic ingredients: henna powder, a water-based liquid, sugar, and high-terpene essential oils. Each component serves a specific structural or chemical purpose in the final product. What matters most is that you keep the recipe simple to avoid interfering with the dye’s ability to bond with the skin.
- Henna Powder: The foundation that provides the actual dye (Lawsone).
- Water/Lemon Juice: Hydrates the powder and triggers the release of the dye.
- Sugar: Acts as a humectant to keep the paste from drying out and cracking off the skin too quickly.
- Essential Oils: Contains “terps” (terpenes) like tea tree, cajeput, lavender, or eucalyptus that darken the stain.
Which Liquid Is Best for Beginner Henna Paste?
Purified water is the most reliable choice for anyone starting out. It provides a neutral base that results in a faster, more predictable dye release window compared to acidic liquids. The interesting thing is that lemon juice is often recommended to beginners, yet it can slow dye release a lot and may bother people with sensitive skin.
If you choose water, your paste will likely be ready in under 12 hours. If you choose lemon juice, you might be waiting up to 48 hours for the same result. Many professional artists find that a “middle ground”—a 1:1 mix of water and lemon juice—offers the best balance of stability and speed.
Which Tools Make Henna Paste Easier?
The right equipment makes the steps for preparing a natural henna paste feel professional rather than messy. The simple fact is that using household items like a digital scale rather than measuring spoons will increase your success rate by ensuring your ratios are exact every time.
- Glass or Stainless Steel Bowl: These won’t stain and are easy to sanitise.
- Silicone Spatula: Essential for scraping the sides of the bowl to ensure no dry powder is left behind.
- Cling Film: Needed to seal the paste and prevent a hard “skin” from forming.
- Nylon Stocking: Used for straining the final paste to guarantee a clog-free cone.
- Cellophane Cones: To hold and apply the finished product.
How Do You Mix Natural Henna Paste Step by Step?
Mixing henna is a therapeutic process that requires a bit of muscle and a lot of patience. If you follow this specific order of operations, you will create a paste that is easy to pipe and leaves a stunning mark.
Step 1: Measure the henna powder
Place your glass bowl on a digital scale and tare it. Carefully weigh out 25g of your chosen BAQ henna powder. Starting with an exact weight is the only way to replicate your results later.
Step 2: Add sugar
Incorporate 13g of granulated sugar into the dry powder. Mixing the dry ingredients first ensures the sugar is evenly distributed, which helps the final paste stick to the skin during the long drying phase.
Step 3: Add water slowly
Pour in about half of your liquid and stir vigorously. Continue adding water a few drops at a time until the mixture reaches the consistency of thick mashed potatoes. It is vital not to make it too thin at this stage.
Step 4: Add essential oil
Stir in 7.5ml of your chosen skin-safe essential oil. You will notice the smell change instantly as the oils begin to interact with the powder.
Step 5: Mix until thick and smooth
Spend several minutes “mashing” the paste against the side of the bowl with your spatula. This mechanical action breaks up tiny lumps of dry powder that could otherwise clog your cone later.
Step 6: Cover and rest
Cover the paste with cling film, making sure it touches the surface completely. This keeps the moisture locked in while the dye molecules mobilise.
Step 7: Test and adjust
Once the resting time has passed, add tiny drops of water until the paste reaches a “melted chocolate” or “toothpaste” consistency. It should ribbon off your spatula smoothly.
Step 8: Fill cones
Transfer the paste into a carrot bag or freezer bag, then pipe it into your individual cellophane cones. Tape them shut tightly to prevent leaks.
How Long Should Henna Paste Rest for Dye Release?
Henna paste must rest to allow the dye to move from the plant material into the paste. The timing varies based on the type of henna and the liquid used. The unexpected thing is that even a few degrees of temperature difference in your kitchen can change the wait time by several hours.
- Rajasthani with water: Typically 6 to 12 hours.
- Rajasthani with lemon: Typically 12 to 24 hours.
- Jamila with water: Typically 12 to 24 hours.
- Jamila with lemon: Typically 24 to 48 hours.
How Can You Tell Henna Paste Is Ready?
Testing for dye release is the only way to know if your paste is ready to use. Simply dab a small amount of paste onto your palm or the tip of your finger and leave it for exactly sixty seconds. The fact is that a “ready” paste will leave a bright, neon-orange mark that is impossible to miss.
If the mark is a pale, faint yellow, the paste needs more time. If the paste has turned a very dark, brownish-black colour on the surface of the bowl but leaves no stain on the skin, it has likely “demised” (expired) because it was left out in the heat for too long.
How Do You Fix Henna Paste Texture?
Achieving the perfect “flow” is often the hardest part of preparing a natural henna paste at home. The paste needs to be thin enough to squeeze out without straining your hand, but thick enough to hold a crisp line. The challenge is that changes in weather—like a sudden drop in humidity—can make your tried-and-tested recipe feel different.
- If it’s too thick: Add water one teaspoon at a time. Do not rush this, as it is hard to reverse.
- If it’s too thin: Add a tiny pinch of extra henna powder and let it sit for 30 minutes to hydrate.
- If it’s too lumpy: This is usually due to poor mixing. Use the “stocking method” to strain the paste through a nylon.
- If it’s too sticky: You may have used too much sugar. Reduce the amount by a few grams in your next batch.
Should You Sift or Strain Henna Paste?
Sifting is a dry process done before mixing, while straining is a wet process done after the paste is ready. If you are using high-end BAQ powder, you can often skip the dry sifting. However, for bridal-quality designs, straining the finished paste through a nylon stocking is a game-changer. It removes every possible lump or air bubble, allowing you to draw for hours without a single clog.
What Mistakes Should Beginners Avoid?
Learning the steps for preparing a natural henna paste is a journey of patience. Actually, most beginners fail because they try to “hack” the process with heat or strange ingredients.
- Avoid using “black henna”: These cones often contain toxic chemicals that can cause permanent scarring.
- Don’t use coconut or olive oil: These are “carrier oils” and will actually block the dye from staining the skin.
- Stop rushing the process: The honest truth is that most failed stains are simply the result of using the paste before the dye has been released.
- Never microwave your paste: Extreme heat will “cook” the henna and destroy the dye molecules instantly.
- Don’t skip the spot test: Always verify the stain strength before spending hours on a full design.
Is Natural Henna Paste Safe for Skin?
Natural henna is incredibly safe and has been used for thousands of years. It should always smell like hay and essential oils—never like petrol, ammonia, or hair dye. The remarkable thing is that true natural henna will always start as an orange stain and darken over 48 hours; it will never be jet black the moment you wash it off.
Before applying a full design, always perform a patch test on a small area of skin to ensure you don’t have a sensitivity to the essential oils used in the mix. If you have a G6PD deficiency, you should avoid henna entirely.
Can You Use the Same Henna Paste for Hair and Body Art?
While the base powder is the same, the recipes are not interchangeable. The surprising part is that the high concentration of essential oils in body art paste can be quite irritating to the scalp if left on for hours. Furthermore, the sugar that makes the paste stick to your hand will make your hair incredibly difficult and sticky to rinse out.
How Do You Store Fresh Henna Paste?
Because natural henna is a perishable plant product, it will lose its staining power if left at room temperature for more than 24 hours. To preserve your work, transfer the paste into cones and store them in the freezer. Frozen henna can stay fresh and potent for up to six months. When you are ready to use a cone, simply take it out and let it thaw on the counter for about 20 minutes.
How Do You Make Henna Stain Darker After Application?
The final phase of our method is to “Stain Smart”. A great stain is a partnership between the artist and the client. You must keep the paste on the skin for at least 6 to 8 hours to allow the dye to fully saturate the skin layers.
Once you remove the paste, do not use water to wash the area. Instead, scrape the dry bits off with a blunt edge. The surprising part is that the stain is a living process; it will continue to darken through oxidation for the next two days. Avoiding water and soap for the first 24 hours allows this chemical reaction to reach its darkest potential.
Final Thoughts on the steps for preparing a natural henna paste
Mastering the steps for preparing a natural henna paste is a rewarding skill that combines ancient tradition with a bit of modern kitchen science. By committing to the “Mix Small” philosophy, you allow yourself the space to learn without the pressure of wasting materials. Remember that the quality of your stain is determined by the quality of your powder and the patience you show during the dye-release phase.
Once you have perfected your 25g batch and feel comfortable with the “melted chocolate” flow of your paste, you can scale up your production with confidence. Whether you are creating art for yourself or others, using a paste you mixed with your own hands ensures a safe, beautiful, and deeply personal experience.

Henna Course
Course Description :
- Certificate: Yes(Free)
- Accreditation: CPD Accredited
- Access: Lifetime