No products in the cart.
Drip. Drip. Drip. Does that sound familiar to you? That tiny sound can be very annoying at night. Sadly, it is also quite expensive. A leaking tap wastes many litres of water. This means your water bill goes up quickly. However, you do not need to worry. You can learn how to fix a leaking tap now. This task is perfect for beginners in the UK. Most people can do this without a plumber. You just need some basic tools and patience. This guide will help you every step of the way. We will make your kitchen quiet and dry again.
Why Should You Learn to Fix a Leaking Tap Yourself?
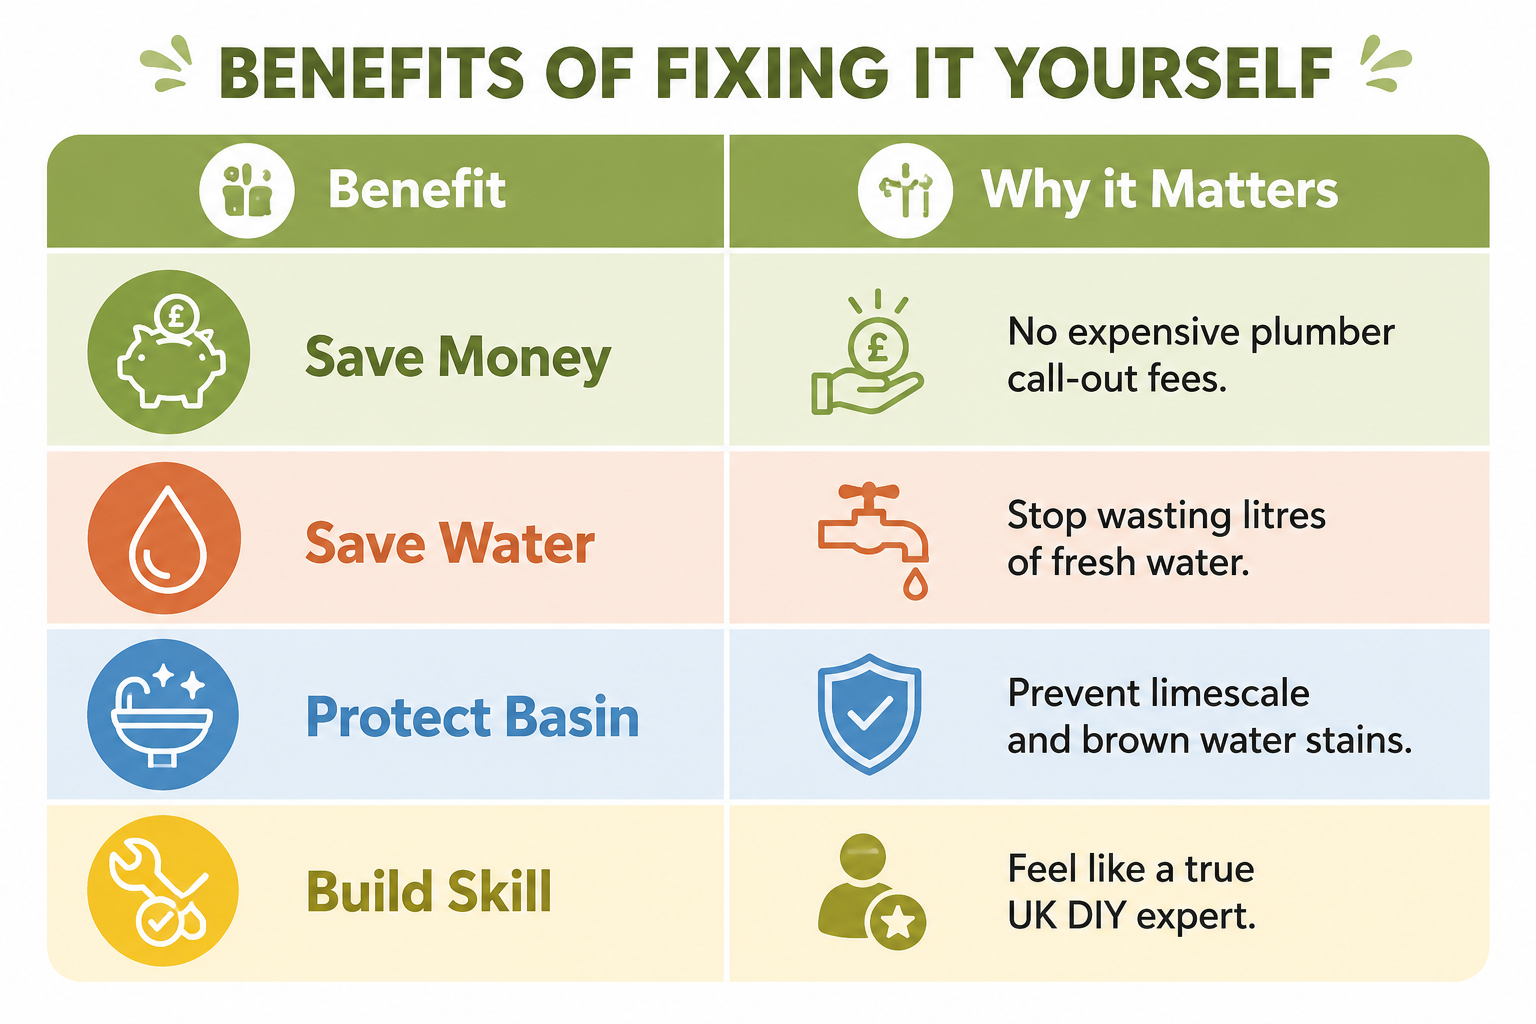
Learning this skill is great for your wallet. In the UK, plumbers can be very expensive. They often charge a high fee just to visit. By doing it yourself, you save that money. You only pay for the small parts. Furthermore, fixing a tap helps the whole planet. We must protect our water for the future. Every drop saved helps the UK environment stay green.
Another reason is your home’s health. Leaking water often leaves ugly brown stains. These marks are usually made of limescale. Limescale is very hard to clean later. Also, constant moisture can lead to smelly mould. A dry kitchen is a much healthier kitchen. Consequently, you will feel proud of your home. Taking care of your flat is a great feeling. You will gain a lot of confidence.
What Tools Do You Need to Fix a Leaking Tap at Home?
Before you start, check your toolbox. You do not need fancy machines for this. Most UK homes have these tools already. First, you need an adjustable spanner. This tool helps you turn metal nuts. Next, find a set of screwdrivers. You will likely need a cross-head and a flat-head. These help you open the tap handle.
You also need the correct replacement parts. These are usually rubber washers or cartridges. If you are unsure, take the old part to Screwfix. The staff there are often very helpful. Additionally, keep some WD-40 or oil nearby. This helps if the metal parts are stuck. Finally, get an old towel or a rag. This will catch any small spills on the floor.
Your Essential Tool Checklist:
- An adjustable spanner for turning nuts.
- A cross-head and flat-head screwdriver.
- New rubber washers or ceramic cartridges.
- WD-40 spray for rusty or tight parts.
- A clean towel to keep things dry.
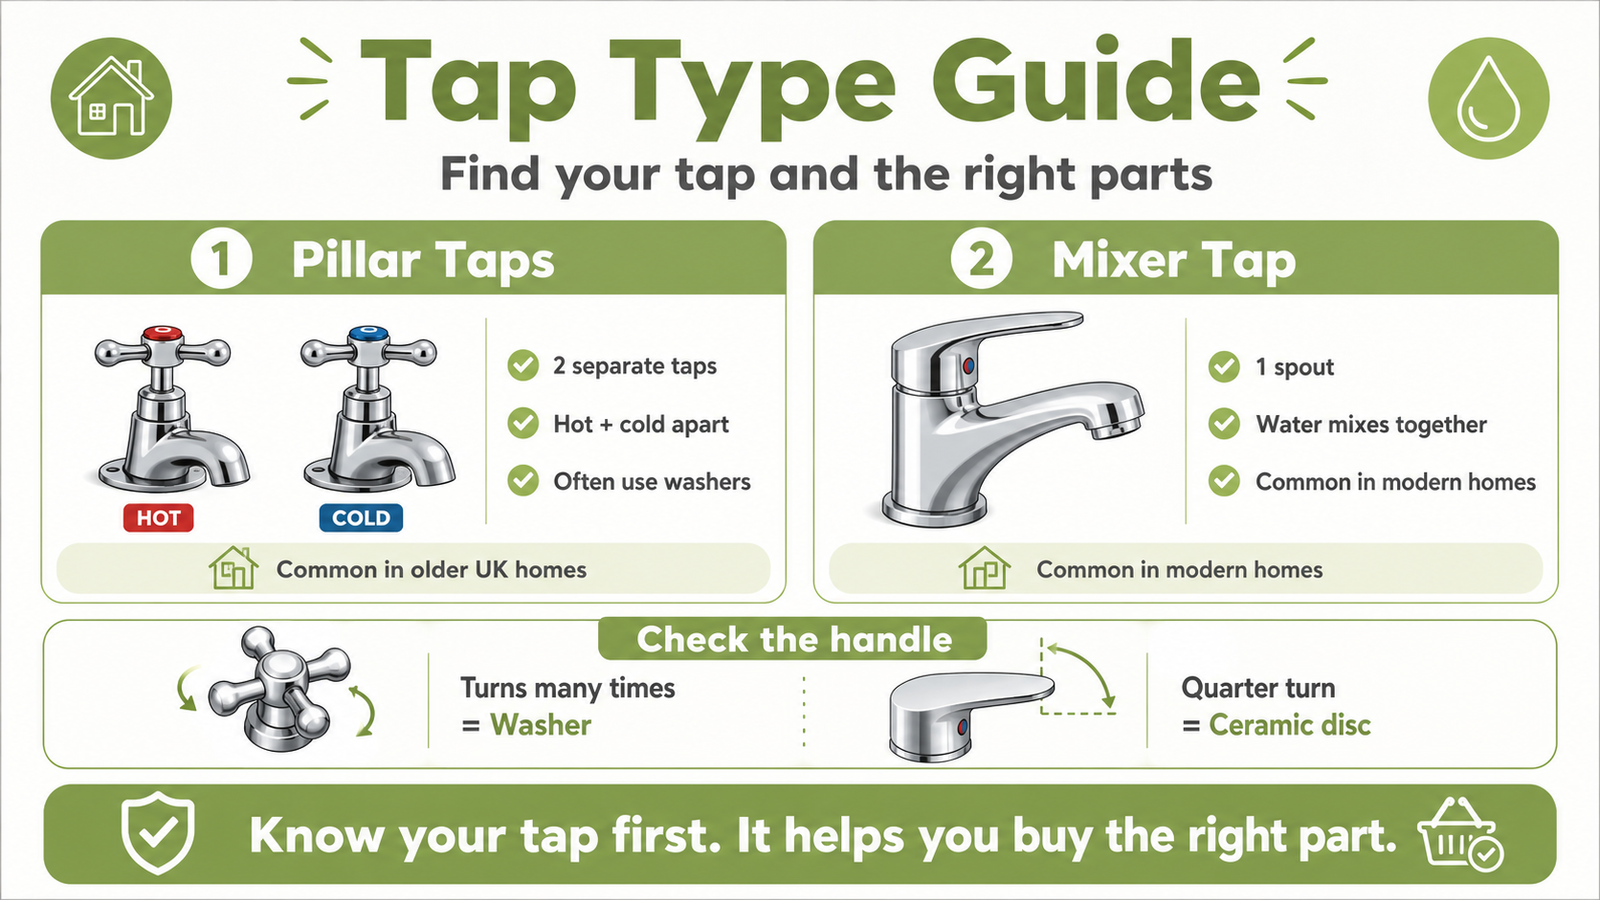
How Do You Identify Which Type of Tap You Have?
Knowing your tap type is very important. This tells you which parts to buy. In many older UK homes, you find pillar taps. These are two separate taps for water. One tap gives cold water. The other tap gives hot water. These usually use simple rubber washers inside.
Modern homes often have mixer taps instead. A mixer tap has only one spout. Water comes out mixed from one place. However, the handles might be different. Do your handles turn many times? If so, they probably use washers. Do they only turn a quarter of the way? In that case, they use ceramic discs. Ceramic discs are like small plastic tubes. They are very common in newer kitchens. Identifying this first will save you a lot of time.
How Do You Turn Off the Water Supply?
You must never skip this important step. If you do, water will spray everywhere! First, look under your kitchen sink. You should see some copper pipes there. Look for a small metal valve on the pipe. This is called an isolation valve. Turn the screw until it stops.
Sometimes, you might not see a valve. In that case, find the main stopcock. This is the main tap for the house. It is often under the stairs or the sink. Turn it clockwise to shut the water off. After that, turn the kitchen tap on. Let the remaining water run out completely. Now, the pipes are empty and safe. You are ready to start the real work.
How Do You Repair a Traditional Washer-Based Tap?
Traditional taps are quite easy to fix. First, find the decorative cap on top. This cap often says hot or cold. Pop it off with a flat screwdriver. Underneath, you will see a small screw. Remove that screw to pull the handle off. Now, you can see the metal valve headgear.
Secondly, use your spanner to unscrew the valve. You might need to hold the tap steady. This keeps it from twisting on the sink. Once the valve is out, look at the bottom. There is a small black rubber ring. This is the washer that causes leaks. Pull the old washer off the metal pin. Put a brand new washer in its place.
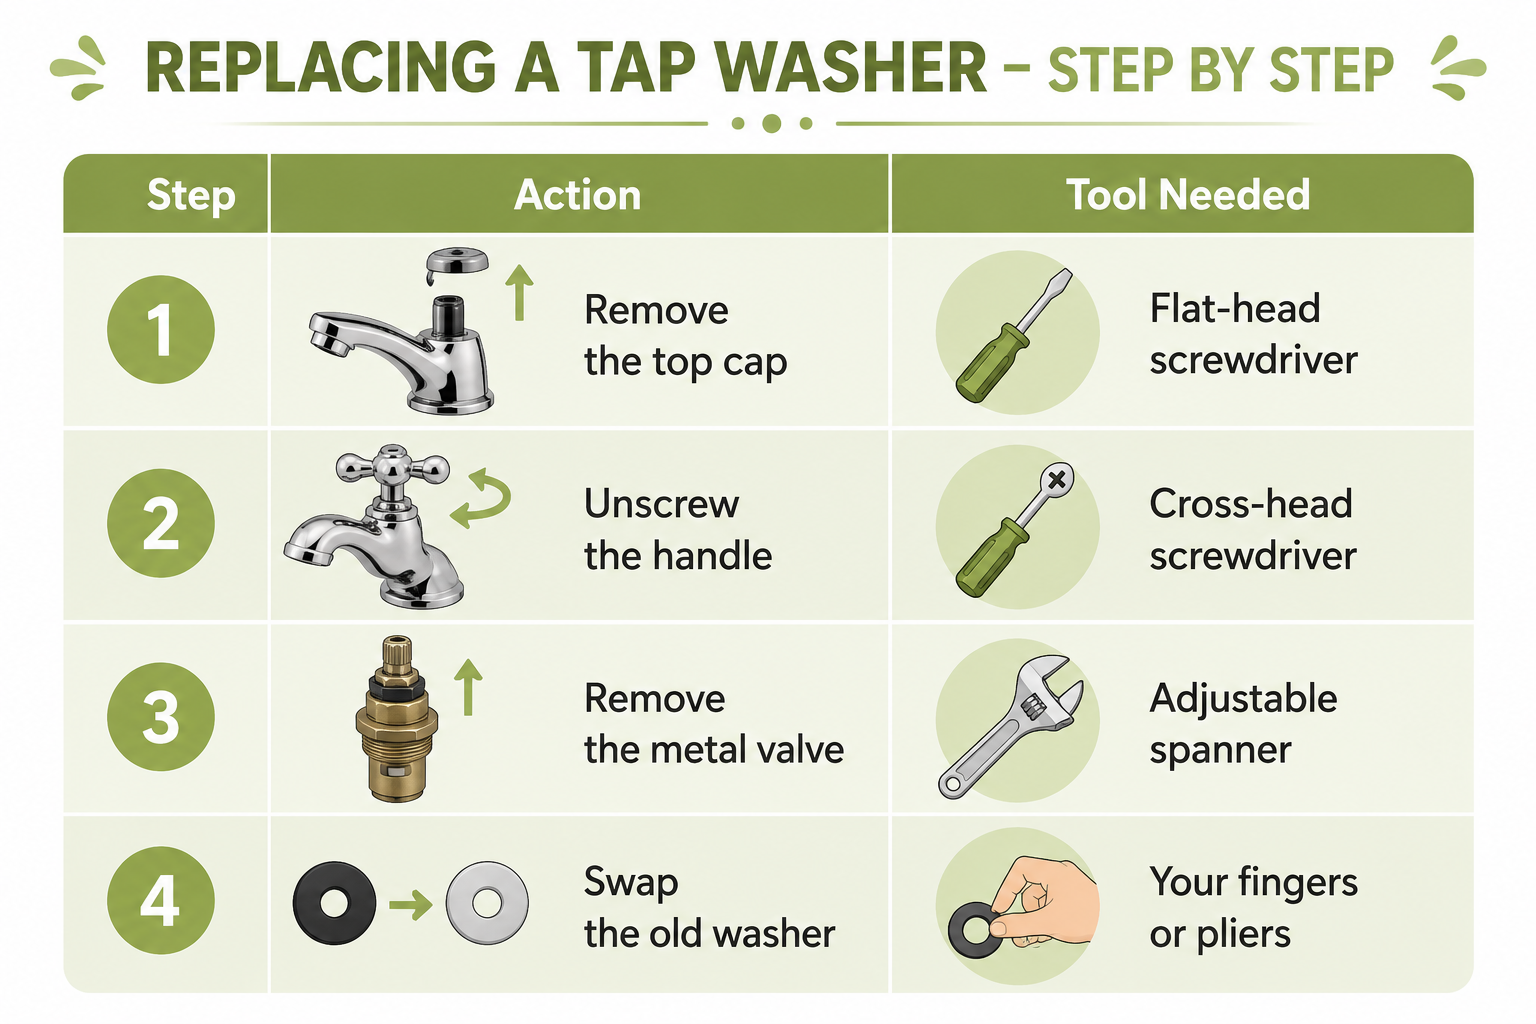
Furthermore, check the metal seat inside. This is where the washer sits. Use a cloth to wipe away any dirt. This ensures a very tight seal. Finally, put the tap back together. Follow the steps in the opposite order. Your leak should be gone now.
How Do You Replace a Modern Ceramic Disc Cartridge?
Ceramic taps are a bit different. They do not use simple rubber washers. Instead, they have a plastic cartridge inside. First, look for a tiny grub screw. This is often hidden under a small cap. Use a small screwdriver to loosen it. Then, lift the handle straight up.
Next, you will see the cartridge nut. Use your spanner to unscrew this part. Take the old cartridge out of the tap. Look closely at the bottom of it. You must buy an exact match for it. In the UK, many brands look similar. However, the sizes can be slightly different.
Take the old part to a DIY shop. Show it to the person at the counter. Once you have the new one, slot it in. Ensure the lugs line up with the holes. Tighten the nut back into place. Put the handle back on and test it. Ceramic taps feel very smooth when fixed.
What Should You Do If the Tap Is Still Leaking?
Sometimes, a new washer does not work. If so, check the O-ring. This is a large rubber ring at the base. If the spout leaks, the O-ring is faulty. You can replace this just like a washer. Simply pull the spout up and off. Then, slide the new ring into the groove.
Check the pipes under the sink, too. Sometimes, the leak is actually a loose nut. Use your spanner to tighten any wet joints. Additionally, look for tiny cracks in the metal. If the metal is cracked, it is bad news. You cannot fix a crack in the metal. In this case, you must buy a new tap. It is better to replace the whole unit. This prevents future water damage in your kitchen.
When Is It Necessary To Call a Professional UK Plumber?
DIY is great, but some jobs are hard. Occasionally, metal parts become stuck together. This is caused by old age and rust. If you pull too hard, you might break a pipe. If a part will not move, stop immediately. It is better to call a plumber now.
Moreover, watch out for leaks behind walls. If you see wet patches on plaster, call help. These leaks are very dangerous for your home. You should also be careful with gas pipes. In the UK, only experts touch gas lines. Luckily, tap repairs usually do not involve gas. However, safety should always be your first priority. If you feel scared, ask for help. A local plumber can finish the job quickly.
Call a professional if:
- The metal parts are completely seized up.
- You see water coming from the wall.
- The kitchen floor feels soft or bouncy.
- You do not feel safe doing it.
Conclusion on Fix a Leaking Tap
You have learned about the tools, the parts, and the process. Saving water is good for the Earth and your bank account. Furthermore, doing the work yourself provides a great sense of pride.
Imagine sitting in your quiet kitchen with a nice cup of tea. The annoying “drip, drip” sound is finally gone for good now. You saved money and learned a very useful new life skill. This is the true beauty of being a handy UK homeowner.
Check your taps every few months for any small signs of dampness. Cleaning away limescale early can prevent the metal from getting damaged later. A little bit of care goes a long way in your home. Congratulations on taking this step toward mastering your own house repairs!
FAQs
1. How do I stop my kitchen tap from dripping?
- Turn off the water supply and check the washer, O-ring, or cartridge inside the tap. Replacing worn parts often stops the drip.
2. Can I fix a leaking tap myself?
- Many leaking taps can be fixed with basic tools and replacement parts. Follow the manufacturer’s instructions and work carefully.
3. Why is my kitchen tap dripping when the water is off?
- A worn washer, damaged cartridge, faulty valve seat, or high water pressure can cause a tap to drip even when it is turned off.
4. How do I stop my kitchen faucet from dripping?
- Shut off the water supply, disassemble the faucet, and replace any worn seals, washers, or cartridges. Reassemble and test for leaks.
5. Do you need a plumber to fix a dripping tap?
- Many minor leaks can be repaired at home. However, if the problem continues or the tap is damaged, a plumber may be needed.
6. What are the common causes of dripping taps?
- Common causes include worn washers, damaged cartridges, faulty O-rings, corrosion, loose parts, and excessive water pressure.